How to Seal A Deck - Details
There are broad areas on a deck and then there are details that should be gotten, for coverage of a complete application.
This might entail separating out the sealed from the non-sealed surfaces, and, applying the liquid in tight, narrow and
difficult to access areas and this with the right tool. With some planning, resulting in better overall protection.
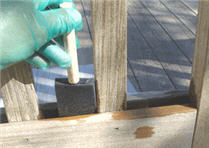
Besides being used elsewhere, the stick foam pads are the perfect tool
for getting up into the baluster rail casings. Otherwise these nooks can be very difficult
to get. The inner lowers are quite visible, but the uppers are noticeable as
well, based on lighting and especially on a raised deck platform as spotted from below.
The foam pads are great also for redistributing excess sealer amounts, after being allowed to soak the grain,
which gives an advantage over the brush.
Whereas brush bristles work the sealants into the grain and for filling in the exposed angles.
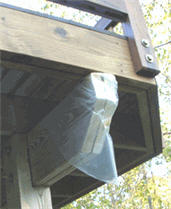
A typical area to be masked with plastic is the perpendicular joint support, the end cuts that will
quickly absorb any spill and show drops. Wrap these in plastic and tape them from the inside.

If there is touch-up it should be done with prudence. After adding sealer to already absorbed areas like on
horizontal rail caps, planks or other sectional boards, run a handled paint pad across the surface and then wipe
it with a cloth to remove any excess, or simply rag it on.
Note: sealers, such penetrating sealers,
will not continue to penetrate after an absorption level has been reached and they will layer on top when an excess amount has been applied.
The end cuts take will take more. This is where water enters and fungi embed and these almost always soak in the sealer.
Brush these out with a 1" brush.


 If there is touch-up it should be done with prudence. After adding sealer to already absorbed areas like on
horizontal rail caps, planks or other sectional boards, run a handled paint pad across the surface and then wipe
it with a cloth to remove any excess, or simply rag it on.