How to Seal Exterior Doors
The doors on your home, exposed to the outside weather, should protect against
temperatures, moisture, drafts and insects. Often, however the weatherstripping
becomes worn or is damaged. Replacing the seal can reflect energy savings and it is
not too difficult a task:
1) Inspect the current form of door seal. Look at the door in 'shut position'.
If present, the seal will likely insulate by one of these types;
- vinyl clad compression seal - these are among the best in terms of durability
and weathertightness. They fit in a kerf around the inner door stop. If the current one
is sized short at the left or right bottom, or at the junctures, chances are it might need replacing.
- self-adhesive foam or felt strip - these have a tendency to loose their flexibility
and must be removed and replaced every so often. If there is a kerf, or small
linear cutout beneath the kerf, the door might take a vinyl clad seal.
- 'refrigerator style' or rubber compression seals - these rubber seals normally
wear with a tendency to tear at stress points, and they could be stapled into position.
They can provide a quality seal on exterior doors.
- vinyl gasket - the roundish, tubular bulb style, tacked or stapled around the perimeter of the door,
is very dependent on the installation - which must be very straight. Other gaskets, of many styles, however
also fit in a kerf around the inner stop and provide a decent seal while offering ease of replacement.
Whichever style seal you decide on, check first with the door manufacturer to
see what seals are available to fit your model door.
2) Remove the current seal. Certain seals may be stapled in place by concealed fasteners.
Check for attachments especially at the top corners although certain seals might be stapled at regular spacing.
If the old seal is of correct measurement, and cut, use the pieces to base the new cuts on.
Otherwise, measure the top and sides, and when doing do, be sure that the seal will reach to the ends,
particularly the bottom, without stretching the new seal.
Any adhesive residue should be made clean, with mild detergent. Clean the outer
door face as well.
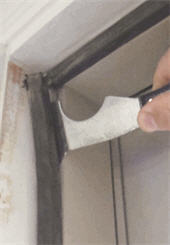
3) Cut the pieces to fit. If cutting the vinyl clad, cut with a sharp utility knife with the piece set atop a wood to cut on.
Self Adhesive Strips - Starting at the hinge side, peel away
the adhesive backing and gently the depress the seal into position, going
continuously in a single direction. Next do the head of the jamb, then the other
side, down to the bottom. It is sometimes wise
to size the seal material at an overcut, waiting to finish-cut the piece as it
is finally placed, since certain materials can potentially shrink or differ
from loose measurement when being applied to the door stop. Snip off any excess
Vinyl Clad - Since no "play" is afforded after starting the
insertion, being at the very end, pressing firmly in place. Depending on the
kerf-to-seal width, you may need to depress the tab into position by pushing
with a blunt putty knife from the backside, taking care not to
score the outer casing material. Progress in a continuous manner to prevent any
binding of material.
It may be wise after placing the first strip to test close the door, to help determine if the replacement seal thickness is of proper size.
The foam seals, for instance, can be installed at incremental thicknesses.
4) Test close the door. Keeping in mind that compression seals like vinyl clad do have some break-in period. An option for doors that
shut far too tight is to look to the jamb striker plate - some have tabs that may be adjusted by bending more open or closed, thus affecting the point of closure.